IMTS 2022: Chasing manufacturing certainty
This week at the International Manufacturing & Technology Show (IMTS), we confirmed what we’ve long suspected: manufacturers (and their customers) are all chasing the same thing, though few have caught it.
Certainty.
That elusive state of having complete confidence in the end-to-end workings of your manufacturing operations, with no doubt in your mind that the products you deliver to your customers are exactly those you’ve designed and promised.
Is absolute manufacturing certainty an idealistic standard? Definitely, and it’s one that’s probably unattainable. But in a world of ever-increasing efficiency and customer demands for perfection (or at least better), driving towards a richer understanding of the intricacies of your manufacturing processes is critical to building better, more consistent products.
There’s no single technology that can comprehensively increase your confidence in the quality of your manufacturing processes. But a prominent thread connecting everything we saw at IMTS was the use of new technology to reduce uncertainty and unaccounted-for variability in different areas of manufacturing.
A renewed but familiar theme
Like much of the manufacturing and engineering world this week, we visited IMTS to connect with the best and brightest, and learn about what’s new in tools, technology, and best practices across all of industrial manufacturing. After a pandemic-driven four year gap (IMTS is run every other year and was cancelled in 2020), energy levels, excitement, and new advances in tech were running rampant. And across the vast expanse of industries, processes, tools and technologies that we encountered, we found a consistent theme: a renewed focus on improving your confidence in a dizzying array of manufacturing processes. That increased certainty is driven in numerous ways, including increased automation, sensorization and digitization of traditional manufacturing processes, active process monitoring, manufacturing data collection, and a whole host of technologies designed to instill manufacturers with more confidence in the products they create.

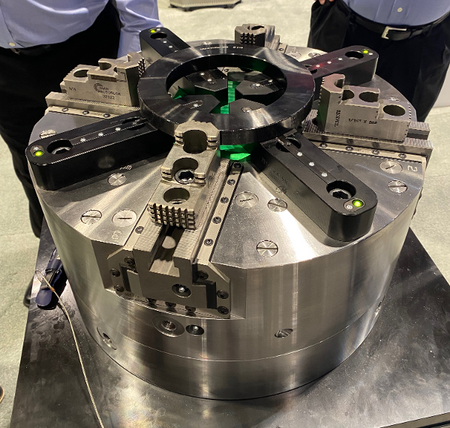
This powered chuck from SMW Autoblok includes four inductive sensors which can detect even slight misalignment of the workpiece it holds. Supervisory software can then prevent the part from entering a machining process and alert a manufacturer to correct the issue before it causes costly waste.
Engineered products are only getting smaller and more complex, and along with that miniaturization comes tighter tolerances and a requirement for more of both manufacturing accuracy and precision. Decrease the size of an assembly far enough and expected typical manufacturing process variation soon exceeds the allowable part tolerances. When that crossover occurs, things randomly stop fitting together, leading to reduced productivity, higher scrap, and increased manufacturing costs. That simple truth is key to the continued demand for more advanced manufacturing technologies that reduce manufacturing uncertainty.
It’s important to note that this demand goes beyond metrology alone — yes, engineers want to know their parts are within dimensional accuracy specs, but there’s a deeper need for surety that extends into the realm of material properties, process control, elimination of internal defects, and more. It’s one thing for a part to fit correctly within an assembly, it’s another entirely to be able to trust that there are no internal voids within that part that will cause a crack to initiate and propagate under load. Manufacturers more than ever need to be able to have that trust in their processes, and the products they turn over to their customers.
Engineering better insights
Exhibitors at this year’s IMTS highlighted this march towards manufacturing insight — innovations like Lumafield’s affordable Neptune CT scanner are bringing high resolution non-destructive evaluation (NDE) and inspection technologies to a much wider audience for which they were previously out of reach. SMW Autoblok’s highly-sensorized workholding systems for CNC machining help manufacturers digitally confirm that work-in-process parts are precisely and properly loaded into a chuck before they’re machined, reducing errors, waste, and the risk of unknowingly delivering defective parts to a customer. And myriad other technologies offered pre-, in-, and post-process inspection and monitoring towards the goal of better quality control and assurance.

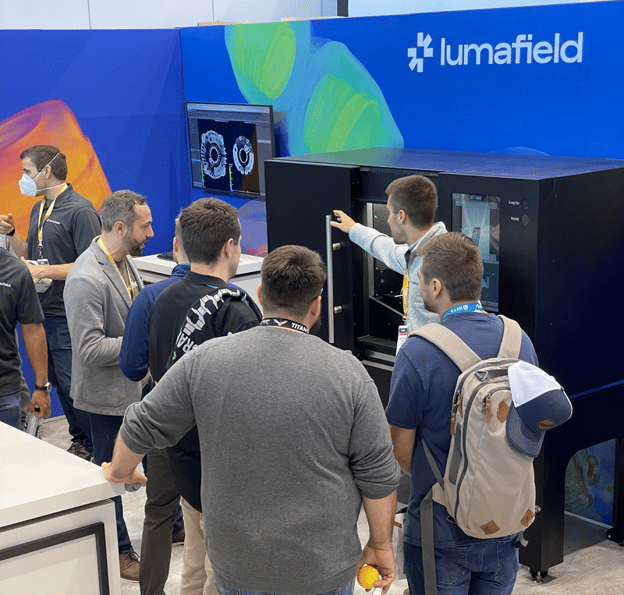
Lumafield’s high-speed, automated CT scanner drew widespread attention from manufacturers looking for more accessible solutions to inspecting the quality of assembled products before they ship to customers (among many other in-demand use cases)
Additive manufacturing notably continues to lag behind more traditional manufacturing technologies in this regard. While a select few OEMs are taking the challenge of delivering manufacturing certainty to their customers seriously — with increasingly robust in-process monitoring and post-print inspection — the industry as a whole is still focused heavily on individual ‘cool’ parts and materials, not the greater manufacturing context in which they play. The reality is that while every AM technology can do amazing things in its own right, engineers across every manufacturing sector still struggle with predicting how a part 3D printed with a specific technology will perform in their real-world application. That uncertainty is a huge blocker to additive adoption, since choosing to use AM means that an engineer introduces an extra level of project risk, regardless of how much faster, cheaper and easier it is to use 3D printing in that application.
A relentless focus on quality
At Holo, we’ve always taken a different, more manufacturing-centric approach. Ensuring high end-part quality and accuracy is core to our DNA, and every engineering decision we make is focused on making incremental continued improvements towards the goal of delivering consistent results to our engineering customers. We want to deliver you the best, most reliable metal 3D printed parts you’ve ever used — or be an awesome first experience with metal 3D printing, if you’re new to the technology. We understand the need of engineers — much like ourselves — to be confident in the parts they receive. That’s why we’ve made two key decisions in organizing our business:
- End-to-end system development, in-house: we’ve always designed and built all of our hardware, software, materials, and processes completely internally, giving us total control over our PureForm metal 3D printing process, and enabling us to precisely engineer all parts of our system to work together to produce the exact parts you want. Since we provide parts as a service, we can quickly roll new process improvements out to our in-house printer fleet, and deliver the best possible quality to our customers.
- Leveraging long-established metrology and inspection: there’s a reason traditional manufacturing employs precise equipment and processes, but still performs quality control and inspection afterwards — it reduces risk, and it just works. There’s no reason to reinvent the wheel, so after sintering, our team fully inspects your parts according to the requirements you previously developed with our engineers.

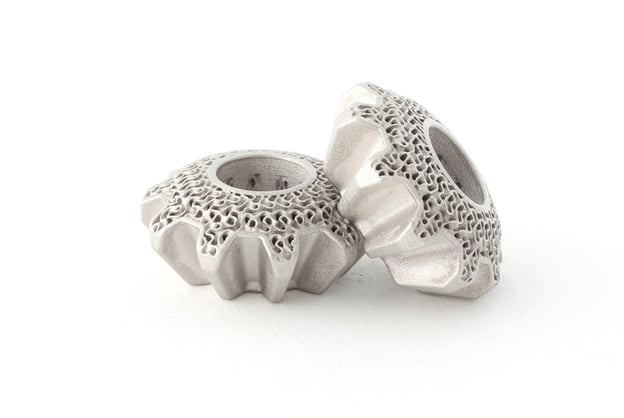
We inspect our high-quality, high-accuracy 3D printed metal parts — even the really complex ones. These bevel gears were printed with our PureForm process, which can capably handle the intricate, internal gyroid lattice designed to reduce their weight.
It’s not absolute manufacturing certainty, but it’s a big step in the right direction.
—
Do you have a project you’d like to discuss with our team? Request a chat with our engineering team to review what you’re trying to accomplish, and see if we can help.


